DIY: Build the Perfect, Travel-Ready Surf/Pier Fishing Cart
I only recommend products I believe in and use myself. If you purchase something using a link to an item on a post, I may earn a small commission at no additional cost to you. Read More
When we pack for the beach, I've always bring a large hitch carrier and the majority of the space is taken up with my surf cart. Last year, I decided to explore the possibility of make the actual carrier convert into a cart.
After walking through Harbor Freight, I noticed they made an all aluminum hitch carrier from Haul-Master and got to work planning how I could convert it into a surf fishing cart. With some basic shop tools, I built a custom, heavy-duty cart that plugs directly into my truck’s hitch receiver for travel and rolls smoothly down to the water.
Warning: Modifying the hitch carrier is for demonstration purposes only…all modifications are at your own risk.
Key Features
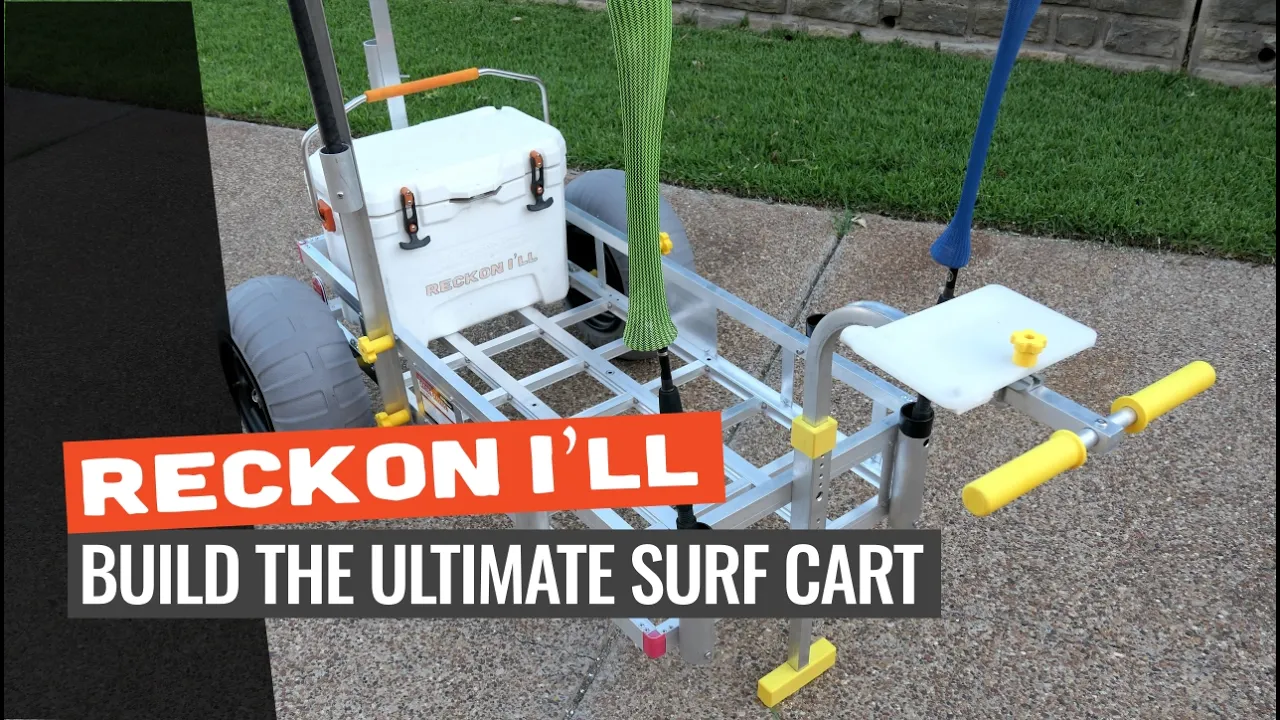
Before we jump into the fabrication, let’s look at the custom features of this build:
Multiple Rod Holders: Features seven total rod holders—four fixed holders for standard gear and three heavy-duty holders designed specifically to carry long surf rods.
Removable Sand Spikes: Built with fixed threaded studs on the cart frame and large nylon star knobs, allowing you to quickly attach or remove your sand spikes for easy transport.
Adjustable Height Kickstand: Uses an inner telescoping leg with a PTO pin to keep the cart level and stable on uneven sand or sloped piers.
Removable Bait Station: Features a custom cutting board that mounts directly to the handle assembly and includes a built-in sheath to hold your bait knife.
Hitch Mountable Design: Slides directly into your truck's receiver hitch with the wheels left on, saving precious cargo space in the bed of your truck.
Quick Release Deployment: Utilizes quick-release detent pins for rapid deployment on short trips, backed up by heavy-duty 100mm highway bolts for long-distance hauls.
Related Posts

DIY: Save Your Fish Bites and Fish Gum from Going Bad and Other Tips for Winterizing Your Surf Gear

DIY: Build a No-Weld Fishing Sand Spike That Will Stand Up to the Surf

DIY: Build a Pump to Summon Ghost Shrimp to the Surface Fast!

DIY: Build a Gigging Light that Will Give the Flounder a Sunburn

DIY: Build a Stowable, Cheap Flounder Gig
Part I: Adding Wheels
Step 1: Assemble the Carrier
Assemble the Harbor Freight Haul-Master cargo carrier frame according to the product instructions. Keep all the bolts slightly loose as you piece the aluminum slats together. Once the frame is completely square, go back and tighten everything down securely.

Step 2: Match Your Axle Size
You must match your axle diameter to your wheel hubs to avoid unnecessary fabrication. I made a mistake on my personal setup by ordering wheels with 20mm hubs, which forced me to use a thinner 5/8-inch solid aluminum axle and 3D print custom adapter sleeves out of glass-fiber reinforced nylon to make them fit.
You can save yourself a massive headache by ordering the Bonnlo wheels with 25mm hubs. If you do that, you can use a sturdy 1-inch solid aluminum round bar for your axle. This setup allows you to use standard, cheap 3/4-inch PVC pipe for your wheel spacers instead of custom 3D-printed parts.

Step 3: Cut the Axle to Length
Measure your 1-inch solid aluminum round bar and cut it to a 39-1/4 inch length. A metal-cutting band saw makes quick work of this, but a standard hacksaw with a bi-metal blade will get the job done with a little extra effort.
Design Tip: Use a metal file or sander to deburr the cut ends of the axle so they do not scratch or bind inside your wheel hubs during installation

Step 4: Drill Tension Pin Holes
Mark your hole locations on both ends of the solid axle where the pins will secure the wheels. Use a center punch to make a solid starting point so your drill bit does not walk across the rounded aluminum surface. Using a 3/16-inch drill bit, drill straight through the axle. Keep your drill speed moderate and apply steady pressure to ensure a straight path.

Step 5: Drill U-Bolt Holes
Flip the carrier frame upside down to mount the axle. While the video shows the axle positioned at the second-to-last crossmember, I recommend straddling the very last crossmember of the frame for the best overall weight distribution and balance. Mark the mounting spots on the aluminum frame. Use a 1/4-inch drill bit to drill completely through both sides of the hollow aluminum frame walls.

Step 6: Install the Wheels and Axle
Line up your axle and secure it to the frame using your M6 stainless steel U-bolts (25mm x 70mm). Make sure to use the metal backing plates that come with the U-bolts to distribute the clamping force across the aluminum frame and prevent the metal from crushing.
Once the axle is clamped down tight, slide on a 2.5-inch length of 3/4-inch PVC pipe on each side to act as your wheel spacers. Slide your Bonnlo balloon wheels onto the axle, and lock them in place by sliding your 3/16-inch lynch pins through the holes you drilled in Step 4.

Materials Needed
(May Contain Links that Earn Commission)
•
1" Aluminum Round Bar (39-1/4")Tools Needed
(May Contain Links that Earn Commission)
Part II: The Pull Handle
Step 1: Cut the Handle Sleeve
Cut a length of square aluminum tubing to serve as the vertical mounting sleeve for your handle.

Build Tip: If you don't want to 3D print a custom collar cap, use 1.25-inch (.095-inch wall) aluminum square tubing for the sleeve, and slide a 1-inch aluminum square tube inside it to allow the handle to telescope smoothly.
Step 2: Drill the Adjustment Holes
Secure your sleeve tubing in a vice on your drill press. Use a 1/4-inch drill bit to drill a vertical series of adjustment holes down the center of the tube. This will allow you to adjust the handle to your preferred pulling height.

Step 3: Attach Handle Sleeve to Cart
Clamp the handle sleeve vertically to the front center rail of the cargo carrier frame. Ensure your alignment is perfectly square using a square, then drill through the sleeve and the frame to bolt the sleeve securely to the cart. Use a 35/64" drill bit to allow a 1/4-20 x 1-1/2" Stainless Flat Head Hex Socket Cap screw to pass through the center cleanly and attach with a Nyloc nut.

Step 4: Build the Kickstand
Using the same nesting square tubing technique, construct an adjustable kickstand leg.
Build Tip: If you don't have a 3D printer to make a custom plastic foot, just cut a short, perpendicular piece of square aluminum tubing and attach it to the bottom of the kickstand leg with a screw).
Drill your adjustment holes and insert a 1/4" PTO pin to lock the kickstand at the correct height.

Step 5: Drill Out the Handle
Take the upper section of your 1-inch square handle tubing. Use a step drill bit to bore a hole straight through the top end. This hole needs to be wide enough to accept the 5/8-inch or 3/4-inch round bar that will serve as your grip.

Step 6: Bend the Handle
Slide your square handle tubing into your manual bender. Slowly bend the tube to a comfortable pulling angle.
Build Tip: You can easily bend your handle without a specialized machine. Use 6063 aluminum tubing, pack the inside of the tube completely tight with dry sand, cap the ends, and slowly bend it over a sturdy round anchor point. I used 6061 aluminum for my handle, which is stiffer and requires a dedicated manual bender to prevent structural cracking.

Step 7: Drill the Adjustment Hole
Drill a final 1/4-inch adjustment hole through the bottom of your bent handle shaft so it can lock into the vertical sleeve on the cart.

Step 8: Assemble the Handle
Slide your round bar grip through the step-drilled hole at the top of the handle. Secure it with a screw, and slide on some 3D-printed plastic grips or wrap the bar with heavy-duty tape for a comfortable grip.

Materials Needed
(May Contain Links that Earn Commission)
•
1/4" PTO Pin (2)•
1.5” Aluminum Square Tube, 1/8". (???")•
1" Alumnium Square Tube, .0625"•
5/8 or 3/4" Aluminum Round Bar (15")Tools Needed
(May Contain Links that Earn Commission)
Part III: The Rod Holders
Step 1: Drill Holes for Small Rod Holders
Cut your 2-inch round aluminum tubing into individual rod holder sleeves. I used a custom, red 3D-printed template clamped over the tube to keep my drill bit perfectly centered on the round aluminum surface. Drill your mounting holes using a 1/4-inch drill bit.

Step 2: Drill Outside Holes to Place on Cart
Slide your red template over the vertical frame rails of the cargo carrier to mark your mounting holes. Drill through the frame rails so they align perfectly with your rod holder tubes.

Step 3: Drill Through Holes to Place on Cart
Position the rod holder against the frame. Drop a screw through your top drilled hole to anchor the alignment while you drill your remaining through-holes.

Step 4: Widen Top Hole
Using your 35/64" step drill bit, widen the outer-facing hole on the top of the rod holder tube. This access hole needs to be large enough to pass a screwdriver or socket through so you can easily tighten the inner 1/4-20" 1-1/4 inch mounting screw to the top frame rail.

Step 5: Plasti-Dip the Rod Holders
To keep your expensive surf rods from getting scuffed or scratched by raw aluminum, dip the top and bottom rims of your cut rod holders in black Plasti-Dip. Let them hang to dry completely before installation.

Step 6: Attach Small Rod Holders
Line up the pre-drilled holes, pass your screws through the widened access holes, and securely bolt the rod holders to the cart frame with a 1 1/4" screw on the top rail and a 3" screw on the bottom.

Step 7: Drill Holes for Sand Spikes
Using the same red template, drill mounting holes along the sand spike and the cart frame to accommodate your larger, removable sand spikes.

Step 8: Make (or Purchase) Sandspike Knobs
You can buy or make large star knobs with internal threads. These allow you to hand-tighten your sand spikes onto the cart frame without needing tools.

Step 9: Drill and Attach Studs for Sandspikes
Slide a 1/4-20" 1-3/4 inch screw through the frame from the inside. Apply a few drops of red threadlocker (Loctite) to the threads, then tighten a standard hex nut down against the outside of the frame. This creates a permanent, solid threaded stud sticking out of your cart. Now, you can slide your sand spikes over these studs and lock them down in seconds using your star knobs.

Materials Needed
(May Contain Links that Earn Commission)
•
Aluminum Round Tube 2" 0.065 wall; 9" (6)Tools Needed
(May Contain Links that Earn Commission)
•
35/64 Step Bit (for widening through holes)Part IV: The Hitch Mount
Step 1: Mark Where Hitch Crosses the Cart
Lay the long steel hitch tongue bar across the bottom of your assembled cargo carrier frame. Use a scribe or pencil to mark exactly where the steel hitch bar overlaps the aluminum frame rails.

Step 2: Drill Holes in Hitch Mount
Using your drill press, drill two 21/64-inch holes through the steel hitch bar to accommodate your M8 mounting bolts.

Step 3: Buy or Make Attachment Hardware
Prep your heavy-duty highway attachment hardware. You will need two M8 bolts cut to 100mm in length, fitted with large, star knobs.

Step 4: Drill Through Frame Into Cart
Align the hitch tongue with your marks under the frame. Drill your mounting holes straight through the aluminum frame of the cargo carrier.

Step 5: Prep Hardware for Welding
Because we want this setup to be completely toolless, we are going to weld the mounting nuts directly to the cart frame. Drop your steel M8 nuts and washers into a jar of white vinegar and place it in an ultrasonic cleaner for 15 to 20 minutes to strip off the zinc coating. (Warning: Never weld zinc-plated hardware, as it releases highly toxic zinc oxide fumes).

Step 6: Glue Hardware in Place
Once the hardware is stripped and dried, align the nuts and washers over the drilled holes on your cart frame. Apply a drop of super glue under each nut to temporarily hold them in place. (Tip: Never keep a bolt threaded inside the nut while welding, as the extreme heat will deform the threads and ruin your hardware).

Step 7: Weld Hardware to Frame
Using your welder, lay down clean tack welds around the base of the super-glued nuts and washers to fuse them permanently to the frame.
Build Tip: If you don't own a welder, you can cold-weld the nuts to the frame using a high-strength epoxy like JB Weld. The weld isn't structural; it's just there to act as a permanent wrench so you don't need tools to tighten your highway bolts.


Step 8: Paint Welds
Once the metal has cooled, scuff the welded areas with a wire brush and spray them with a coat of black rust-preventative paint to protect the raw steel from salt air.

Materials Needed
(May Contain Links that Earn Commission)
Tools Needed
(May Contain Links that Earn Commission)
•
21/64" BitWrapping Up
Converting a utility cargo carrier into a custom, dual-purpose surf cart takes some sweat equity, but it pays off big time down on the coast. By building your own, you get a bombproof cart that carries seven rods, features an integrated cutting station, and handles deep sand with ease—all while saving hundreds of dollars compared to retail beach carts. Best of all, you can load it down with your cooler and gear, plug it straight into your vehicle's receiver hitch, and hit the highway without taking up an inch of cargo space in your truck bed.
Hope it helps y'all!