DIY: Building A Fishing Rod Carrier That Can Trek Cross-Country
I only recommend products I believe in and use myself. If you purchase something using a link to an item on a post, I may earn a small commission at no additional cost to you. Read More
My father typically rents a van to make our somewhat frequent trips to the coast during the summer as it better accommodates the mounds of gear we bring when we vacation. This makes it easy to pack in the surf rods without too much hassle.
Unfortunately, with the rental companies selling their fleets during COVID-19, rentals are few and far between, and if you can find one, you will have to pay dearly for it.
I decided to jump in and build a rod carrier that could handle the trek to Alabama on the roof rack of their Subaru.
Related Posts


Step 1: Cut the Tube to Length
Using your maximum length rod as a point of reference, cut the tube 3” longer than your longest rod.
In my case the longest rod is 7’6” so I cut the tube to 7’8”.

Step 2: Cut Padding for the Caps
Using the cap as a template, cut two circles of grouting sponge to serve as padding for the end caps.

Step 3: Glue on the Slip Cap
Place one of the circles of sponge inside the side you plan to cap.

Glue the slip cap onto one end of the pipe.

Step 4: Glue the Threaded Cap Receiver
Glue the threaded cap receiver onto the other end of the pipe.

Materials Needed
(May Contain Links that Earn Commission)
•
4″ PVC Slip End Cap (Part 1)•
4″ Threaded Fitting & End Cap (Part 1)•
PVC Primer and Glue (Part 1)The brackets are made from aluminum angle connected to a length of flat stock. The brackets are designed to be adjustable to fit any size luggage rack bar. I chose to route mine to allow that adjustability.
Step 1: Cut Angle for Adjustable Bracket Ends
Cut four 6″ lengths of aluminum angle. Two pieces are used per bracket, and you will need two brackets to hold the rod tube.

Step 2: Align and Scribe the Top of the Brackets
Its important to ensure that the brackets hardware will lineup with each other. Using two machine vises, I lineup all four brackets and score a straight line across the top using a square.

Step 3: Scribe the Bottom of the Bracket
Using the U-bolt as a template (the spread will vary on each U-bolt so just pick one), align the top line with the center of one threaded end of the U-bolt.
Mark and scribe a line at the bottom of the bracket where the center of the other threaded end of the U-bolt will land.

Step 4: Mark the Drill Location for the U-bolts
Find the center of the bracket where you want to drill the hole for the u-bolt. Be sure to account for the extra 1/8″ angle on the bottom-side.
Scribe a line down the center. Using a punch, mark the interaction of the lines at both the top and bottom of the bracket. This will be where you drill.

Step 5: Drill the U-Bolt Holes for All Four Brackets
Align your drill bit with the intersection you marked at the top and bottom of each bracket and drill a 3/8″ hole. Take your time as precision is key here.

Check the bracket is aligned properly by test fitting after you finish each side.

Step 6: Mark the Center of One Side of the Bracket
The bracket will have one fixed-side and one adjustable side. You need to drill a hole to accommodate the adjustable side.
Measure the distance between to the two holes and mark the center with a punch.

Step 7: Drill The Center Hole on the Adjustable-side of the Bracket
Drill a 5/16″ hole at the marked center of one-side of the bracket. Again, work your way up from a smaller bit to the 5/16″ bit.

Step 8: Cut Lengths to Form the Adjustable Channel
Cut four 9″ lengths of the 1″x 1/4″ stock. This will be used to form the channel the links the two brackets.

Step 9: Attach the Fixed End of Each Bracket
The 9″ length of stock will be welded to side of the bracket without the middle screw. Be sure to clamp it where a 5/16″ screw can easily slide into the center hole.

Weld the first piece in place.

Step 10: Weld the Remaining Channel
On the other side of the hole, being sure the pieces are parallel and a screw can easily fit the entire length of the channel, weld the second piece in place.

Weld all sides of each piece of 1″ stock and the fixed-side of the bracket.

Step 11: Cut the End Piece of the Channel
In order to firm up the channel, cut an end piece of scrap stock the width of the channel pieces. You can use a small length of the 1″ stock if you do not have scrap.
I chose to use a smaller piece of scrap stock.

Step 12: Attach the End of the Channel
Weld the piece cut in step 11 to the end of the channel.

Step 13: Assemble the Bracket
Place a small washer on top of the angle iron and thread the 5/16″ x 1″ bolt through the bracket and the channel.

Place a larger fender washer on the back and hand-tighten a nyloc nut.

Step 14: Attach the U-Bolts
Thread the U-Bolts into each bracket and hand tighten the provided nuts with the U-bolts onto each end. Your bracket is complete.

Materials Needed
(May Contain Links that Earn Commission)
•
1″ (1/4″ thick) Aluminum Flat Bar•
1.5″ x 1.5″ (1/8″ wall) Aluminum Angle•
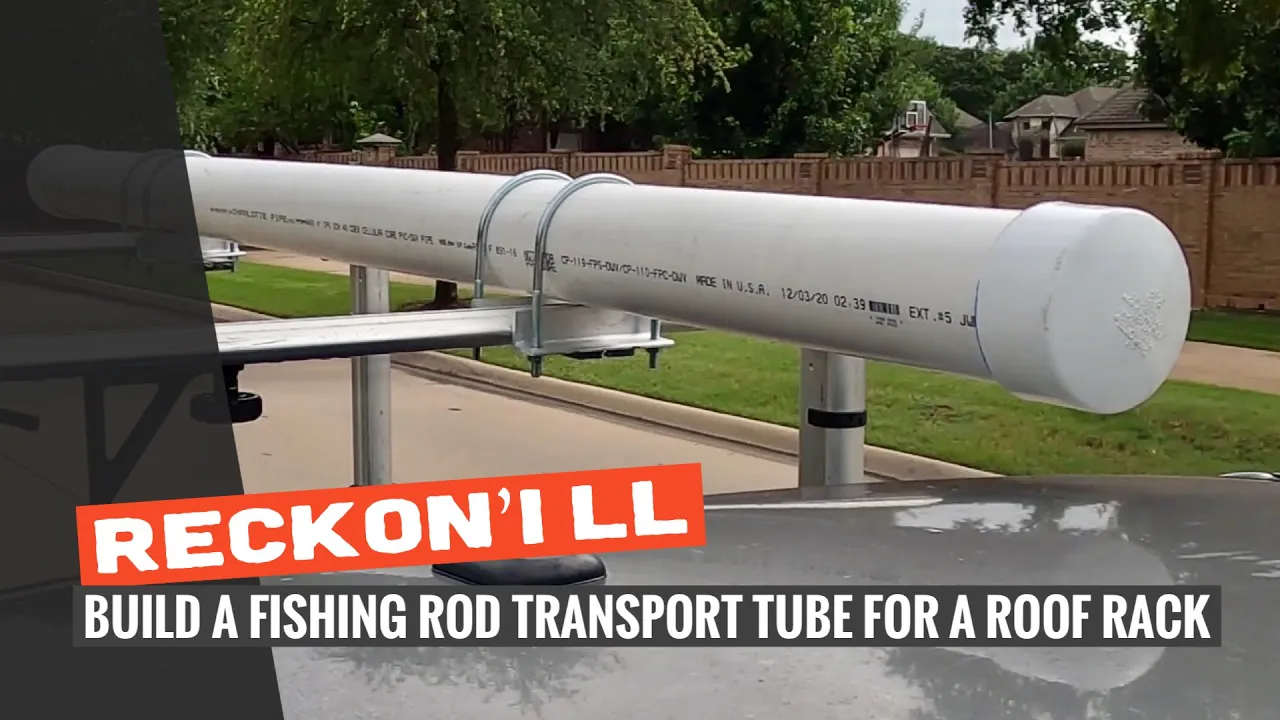
Stainless hardware (5/16″ bolts, washers, nyloc nuts)Final Product
Upon completion, you should have a rock-solid carrier that can adjust to any car rack you throw its way.

