DIY: Repair Arrow Fletching
I only recommend products I believe in and use myself. If you purchase something using a link to an item on a post, I may earn a small commission at no additional cost to you. Read More
Whether you’ve lost a vane in the brush or you're cleaning up an arrow for the kids, learning to fletch your own arrows is a valuable skill. Using a reliable tool like the Bitzenburger Jig ensures a perfect, consistent fletch every time.
Related Posts

Step 1: Strip the Old Vanes
To get started, you need a clean shaft. Use a standard vegetable peeler to strip off the old vanes. It is surprisingly precise, but be careful not to cut into the carbon shaft. Use light, shallow strokes to remove the vanes and the bulk of the old glue. [00:00:26] Once the vanes are gone, use an abrasive pad to scuff off any remaining glue residue until the surface is smooth. [00:01:00]
Step 2: Clean the Shaft and Vanes
Any oils or residue will prevent the glue from bonding. Use a Q-tip or cloth soaked in alcohol to wipe down the area where the new vanes will go. [00:01:05] It is also a good idea to wipe the base of the new vanes with alcohol to ensure they are completely clean before applying glue. [00:02:49]
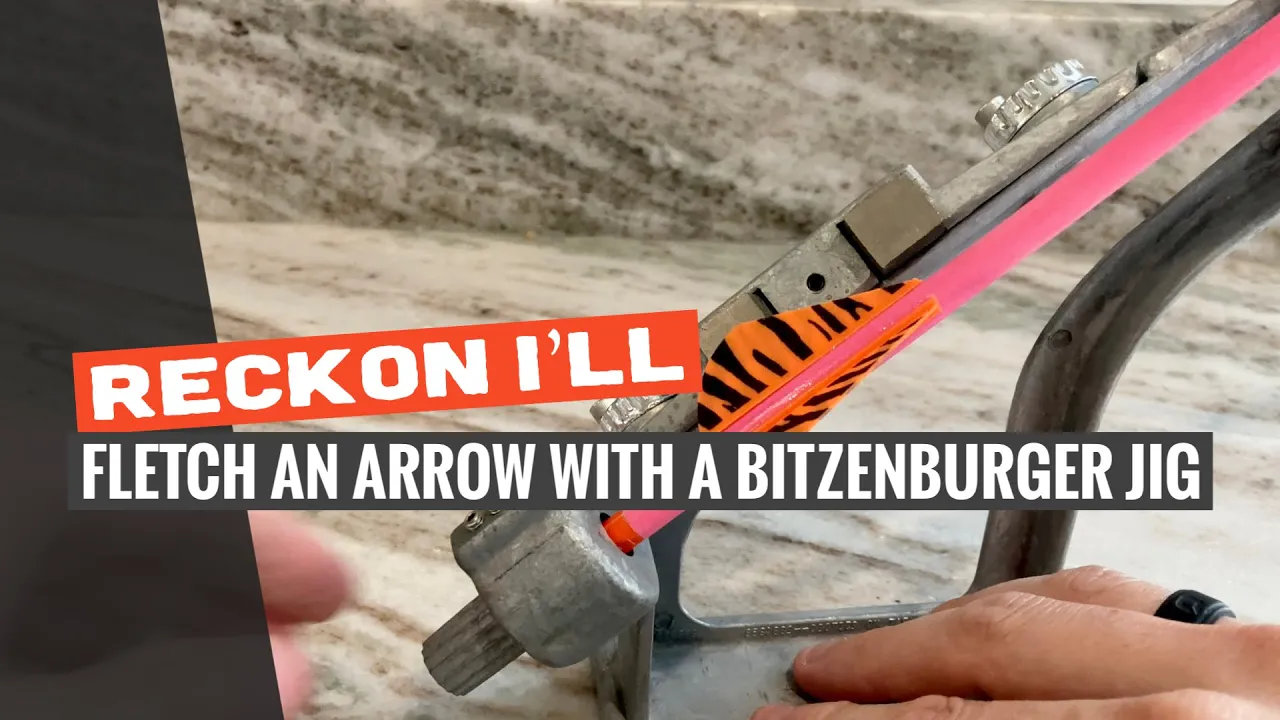
Step 3: Set Up the Bitzenburger Jig
The Bitzenburger allows for various configurations (straight or helical) and intervals (120°, 90°, etc.). For a standard 3-vane setup, set the jig to 120°. [00:01:24]
Place the arrow into the jig.
Slide a vane into the metal clip, using the built-in markings to ensure the distance from the nock is identical for every vane. [00:02:00]
Perform a "dry run" by placing the clip on the magnet and sliding it toward the shaft to check that the vane makes even contact from front to back. [00:02:16]
Step 4: Glue and Press
Run a small, thin bead of super glue down the base of the vane. Use the tip of the glue bottle to spread it out so the entire base is covered without being over-saturated. [00:02:40] Anchor the bottom of the clip into the jig and let the magnet pull it into place against the shaft. Press down firmly for a few seconds and let it cure. [00:03:03]
Step 5: Repeat and Finish
Once the glue has set, slowly pinch the clip and lift it away to ensure you haven't accidentally glued the clip to the vane. [00:03:26] Turn the knob on the jig to the next 120° interval and repeat the process for the remaining vanes.
Pro Tip: Once all the vanes are attached, place a tiny "tip and tail" dot of glue at the very front and back of each vane. This reinforcement helps prevent vanes from being stripped off when passing through dense targets. [00:04:15]
Wrapping Up
Using a jig like the Bitzenburger takes the guesswork out of the process and ensures your arrows fly true. It only takes a few minutes per arrow and is a great way to maintain your gear at home. Hope it helps y'all get back out to the range!
Materials Needed
(May Contain Links that Earn Commission)
•
Isopropyl Alcohol and Q-tips•
Vegetable Peeler (dedicated to arrow work)•
Abrasive Pad or Scuff Pad