DIY: Build A 3D Printed Lure Turner For Flawless Epoxy Cures
I only recommend products I believe in and use myself. If you purchase something using a link to an item on a post, I may earn a small commission at no additional cost to you. Read More
I have ruined way too many good custom-painted crankbaits because the clear coat pooled and sagged while drying. When you put that much sweat equity into airbrushing a lure to help fill the freezer, a bad epoxy finish is a massive frustration. I needed a reliable setup to keep those lures spinning slowly so the epoxy cures perfectly even, but I didn't want to overspend on a commercial rig.
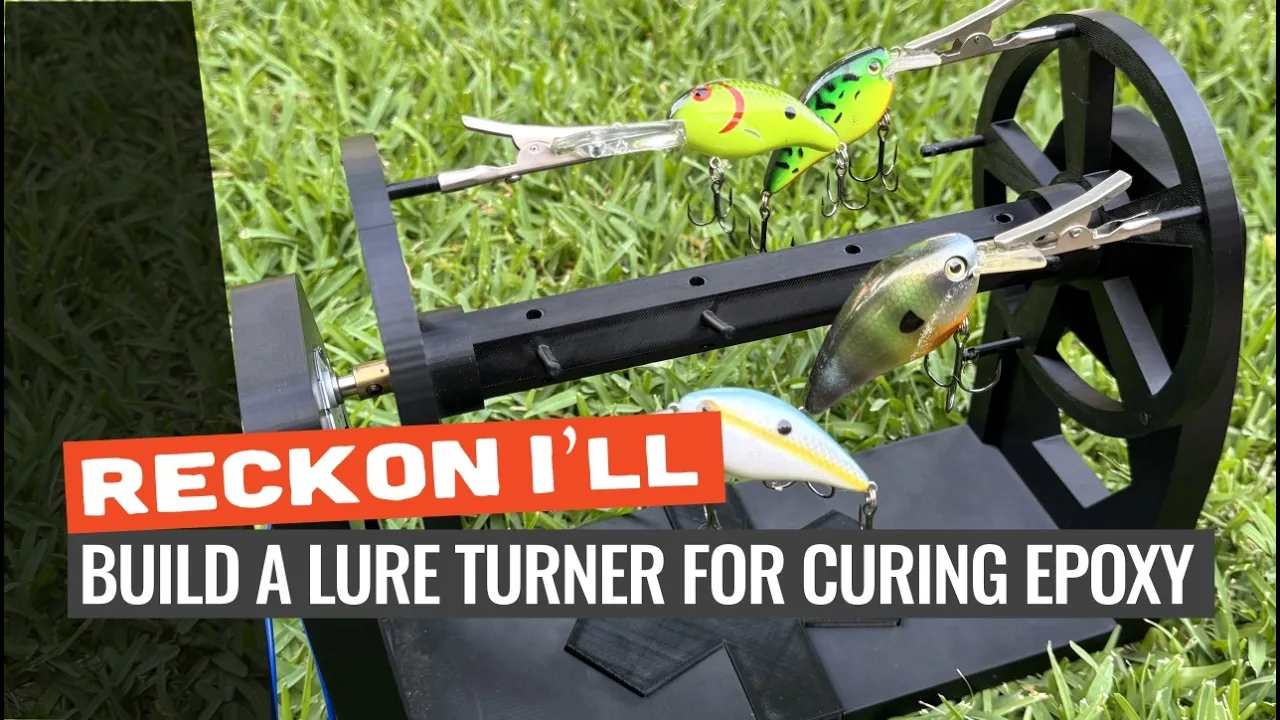
I designed this modular 3D-printed lure turner and powered it with a cheap, low-RPM TYC microwave motor kit I found on Amazon. It is lightweight, sturdy, and totally modular for whatever size batch you are working on.
Step 1: 3D Print and Assemble the Base
Print all required sections from the provided MakerWorld files. Connect the two upright main pillars using the tapered middle section. Press the base pieces firmly together on a flat surface so the whole rig sits rigid.

Step 2: Install the Microwave Motor
Take your TYC microwave motor and route the blue wires through the designated housing hole on the motor-side pillar. Push the motor firmly into the 3D-printed recess until it sits flush.

Step 3: Seat the Brass Motor Fitting
Take the drive wheel and insert the brass motor fitting into the center hub. The latest version of my 3D print file is designed so this fits incredibly snug right off the printer. Add a dab of two-part epoxy to lock it in firmly without slipping under a heavy load.

Step 4: Tighten the Set Screws
Slide the wheel assembly over the microwave motor shaft. Take a small Allen key and tighten the set screws on the brass fitting. (Tip: Do not overtighten and strip the brass, just get it snug against the flat side of the motor shaft). Because this wheel is directly driven by the motor, it will not spin freely by hand.

Step 5: Cut and Install the Bearing Spoke
Grab an M12 bolt and cut off the threaded portion entirely. I used a horizontal band saw for a clean cut, but a hacksaw or angle grinder works perfectly if that is what you have lying around. You want to leave exactly a 1-inch length of the smooth metal shank. Slide this shank into the non-motor pillar side and press it in firmly.

Step 6: Press in the Bearing
Take your secondary wheel and lay it flat on a hard surface. Press your standard skateboard bearing directly into the center hex-hole. Use the palm of your hand to seat it completely flush. Slide this wheel directly onto the 1-inch length of the M12 bolt shank so it spins silently and freely.

Step 7: Install the Axle
Take the main hexagonal axle spoke and align it with the center hubs of both wheels. Press it firmly into the bearing-side wheel first, then press it onto the motor-side wheel. Ensure the pre-drilled holes on the axle are facing outward to accept your lure holders.

Step 8: Install Alligator Clips
Insert your alligator clips into the small holes along the hexagonal axle. (Tip: Stagger the clips on different sides of the hex axle so your lures don't knock into each other while spinning).

Step 9: Wire and Test the Motor
Take the raw ends of your blue motor wires and insert them into the wire quick-connect adapter provided in the TYC motor kit. Hook the opposite side of the adapter to the switched wall-plug cord that came in the same kit. Plug the cord into the wall and flip the switch to test your rotation.

Step 10: Spin Your Baits
Clip your airbrushed crankbaits into the alligator clips. The slow, continuous rotation actively fights centrifugal force and gravity, preventing your fresh epoxy from sagging or forming heavy spots while it cures.

Materials Needed
(May Contain Links that Earn Commission)
Related 3D Prints
Wrapping Up
Having a dedicated lure turner takes all the guesswork out of the final clear coat phase. You get a glass-smooth, professional finish on your custom baits every single time without babysitting them with a heat gun.
Hope it helps y'all!