DIY: Weld An Archery Bag Target and 3D Target Stand
I only recommend products I believe in and use myself. If you purchase something using a link to an item on a post, I may earn a small commission at no additional cost to you. Read More
When searching for a target stand, I had three specific requirements: portability for moving between home and East Texas, flexibility to switch between various bag targets and 3D targets simultaneously, and durability for year-round outdoor use.
This DIY solution uses drop steel to create a heavy, stable platform with a modular design. It consists of four main components that slide together and can be assembled or disassembled in less than a minute.


Step 1: Assemble the Base
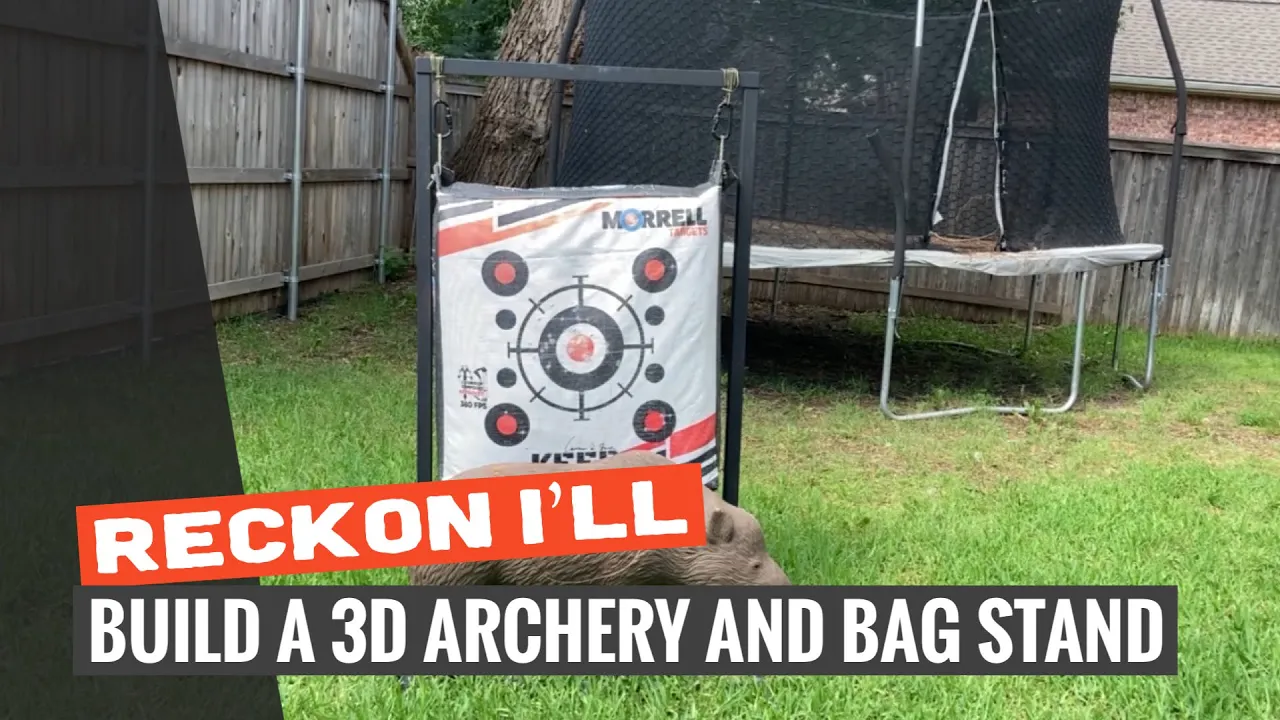
Lay out the 1” 11ga square tube to form the foundation. Weld the frame together. Using the heavier 11ga steel here ensures the bottom platform is weighted enough to anchor the entire stand against the impact of high-velocity arrows. [00:00:20]
Step 2: Add Upright and 3D Mounts
Upright Supports: Weld the 7 3/4” sections of 1 1/4” square tube to the base. These act as the "receivers" for your vertical posts. [00:00:37]
3D Target Rail: Drill holes through the 1/4” flat bar to match the spacing of your 3D target's mounting holes. Insert 6” carriage bolts through the bar, securing them with nuts, then weld the flat bar across the base frame. [00:01:48]
Step 3: Fabricate the Top Brace
Weld the 2” sections of 1 1/4” square tube to each end of the 34" angle iron. [00:00:53]
Pro Tip: Leave a small gap between the angle iron and the square tube fittings to ensure they slide easily into the 1 1/2" uprights without binding.
Step 4: Finishing and Hardware
Paint: Coat all bare metal surfaces with flat black spray paint to protect the stand from the elements.
Hanging System: Tie two Prusik knots using paracord around the top angle iron. Attach carabiners to these knots. The Prusik allows you to slide the attachment points horizontally to accommodate different bag target widths. [00:01:03]
Step 5: Assembly and Use
Slide the two 60” uprights onto the base supports. [00:00:42]
Drop the top brace into the uprights.
Hang your bag target from the carabiners and slide the 3D target onto the carriage bolts. [00:01:26]
Performance Note
The stand is designed for minimal sway. If you experience movement with particularly heavy bag targets, you can run a length of paracord behind the target to the uprights to further stabilize it during practice. [00:02:06]
Materials Needed
(May Contain Links that Earn Commission)
•
1” 11ga Square Tube (39.5” x 2; 34” x 1) •
1 1/4” 14ga Square Tube (7 3/4” x 2; 2” x 2)•
1 1/2” 14ga Square Tube (60” x 2)•
1 1/2” Angle Iron (34”)•
1/4” Flat Bar (36”)•
6” Carriage Bolts (x2)•
1” End Caps•
Muddy Carabiners (x2)•
Flat Black Spray Paint•
Morrell Keep Hammerin’ Bag•
Rinehart Woodland Boar 3D Target